Sunday, March 31, 2013

BBQ Cheddar & Crispy Onion Meatloaf

"Meatloaf, smeatloaf, double beetloaf. I hate meatloaf."

This is the line that comes to mind whenever I think of meatloaf.  It is from one of my favorite movies, A Christmas Story.  Randy, Ralphie's younger brother, says this while sitting at the kitchen table poking at his dinner with a fork.  I think this is the sentiment a lot of children people have towards meatloaf. I myself was not a fan of the the log shaped meal as a child but have grown to accept it as an adult.  Especially when it is loaded with cheese and covered in a deliciously tangy sauce like this BBQ, Cheddar, & Crispy Onion Meatloaf.


Here are the Fresh & Easy players:


So these are wonderful little cheese snacks that I typically pack in my lunch but I decided to cut of 3 of them and use them in this meatloaf.

Mix ground beef, breadcrumbs, cubed cheese, egg, sauteed onions, BBQ sauce, Worcestershire  sauce, garlic powder and crispy onions in a large bowl until well combined.

Form the mixture into 4 loaves and place on a baking sheet lined with tin foil. Coat with 1 tbsp of BBQ sauce. Bake in a 425 oven for 15 minutes.

Take the loaves out of the oven and coat with shredded cheese and crushed crispy onion. bake for an additional 5 minutes. 

To make your A Christmas Story complete serve these meatloaves with this mashed potato substitute made with cauliflower

BBQ Cheddar and Crispy Onion Meatloaf
adapted from Iowa Girl Eats


Ingredients:
  • ½ sweet onion, chopped
  • 1 Tablespoon olive oil
  • 1lb lean ground beef
  • 1 egg
  •  1 Tablespoon Worcestershire sauce
  • ¼ cup + 2 Tablespoons BBQ sauce, divided
  • ¼ cup panko bread crumbs
  • ½ tsp garlic powder
  • 1oz low-fat cheddar cheese, cubed
  • Salt and Pepper
  • ¼ cup shredded cheddar, for topping
  • ¼ cup crispy onions, for topping

Directions:

  1. Preheat oven to 425.
  2. Heat olive oil over medium high heat.  Add chopped onion and cook, stirring occasionally, until onions are golden. Cool slightly.
  3. In a large bowl combine ground beef, egg, Worcestershire sauce, 2 Tablespoons BBQ sauce, panko bread crumbs, garlic powder, cubed cheese, pinch of salt and pepper, and sautéed onions. Mix until combined. Form the mixture into 4 loaves and place on a baking sheet lined with tin foil. Coat each loaf with 1 tbsp of BBQ sauce. Bake in a 425 oven for 15 minutes.
  4. Take the loaves out of the oven and coat with shredded cheese and crushed crispy onion. bake for an additional 5 minutes.


Artichokes with Lemon Dipping Sauce

Happy Sunday! I just had to take a super quick moment to post about my trip to Fresh & Easy today! First off, I was determined to get there because of there 3x points promotion which ended today.  As I was wandering the aisles I found the most awesomely amazing product ever.  Microwavable artichokes. What a concept, right?! These puppies come pre-trimmed in a bag that is ready to be popped in the microwave for 6-7 minutes. Then, voila! Steamed artichoke perfection.  I'm used to having to sit around and wait for 40 minutes or longer for the veggie to steam  so I have to admit the idea of microwaving was quite intriguing. I snatched a bag and made this little dish immediately once I returned home and unloaded all my groceries!


So, here is the convenient microwavable package along with the other ingredients used. I decided to add Italian breadcrumbs after the photo shoot.

Open the bag, open the artichokes a little, and squeeze in the juice of half of the lemon.
z

Then add in about 2-3 tablespoons of Italian seasoned breadcrumbs and 2 teaspoons of Lemon Pepper. Seal up the bag and pop it in the microwave for 7 minutes.

Meanwhile....

Make the dipping sauce in a small bowl, mix together 1/4 cup greek yogurt, 1/4 cup mayonnaise, juice from the other half of the lemon, and 1/2 tsp lemon pepper. 


Once the artichokes are done, let them rest in the bag for about a minute and then serve with the side of dipping sauce. Yummy. For instructions on how to eat an artichoke, click here and skip to step 6.  Don't forget the heart, it is the yummiest part.


Thursday, March 28, 2013

Garlic & Rosemary Mashed Cauliflower

Hi, my name is Shelly and I'm a carb-aholic.  There. I said it.  I love me some carbs. Especially mashed potatoes. I've mastered the mashed potato. It's the one thing I confidently offer to bring to Thanksgiving dinner because I know it will deliver.  

You can imagine my excitement when a couple years ago mashed cauliflower recipes started spreading over the internet like wildfire. A way to eat mashed goodness without all the guilt - I'm in! So, I started trying recipes and as much as people want to claim it is just like the real thing, they are bold-faced liars! I've tried and tried and have been disappointed one recipe after the next... until I came across this one...  With just a couple Fresh & Easy ingredients, you can whip up this side dish in a flash and actually enjoy it!


Here are the cast of Fresh & Easy characters that make this delish dish:
I decided that I wanted to add the Rosemary after my initial ingredient photo shoot.


Ok, seriously y'all - this is the easiest recipe EVER.  Ready....
Step 1. Microwave bag of Cauliflower florets per instructions on package.  Open bag.
Step 2. Place steamed cauliflower in food processor/blender with all other ingredients and pulse to desired consistency.  

Ok, so it still has some of the sinful ingredients that make Paula Deen proud like butter, parmesan and cream cheese but overall I think it is still a healthier option than the original. 

Garlic & Rosemary Mashed Cauliflower
Adapted from Food Network

Ingredients

  • 1 bag microwave-ready cauliflower florets
  • 1 tablespoon cream cheese, softened
  • 1/4 cup grated Parmesan
  • 1/2 teaspoon garlic powder ( you can use fresh garlic but I find it a little too spicy for this and prefer the powder)
  • 1/8 teaspoon straight chicken bullion
  • 1 teaspoon chopped fresh or dry rosemary
  • 3 tablespoons unsalted butter
  • Salt & Pepper to taste

Directions

  1. Microwave cauliflower florets using instructions on package.
  2. Placed steamed cauliflower in a food processor or blender with remaining ingredients.  Pulse until desired consistency is reached. Use a spatula to scrape sides of food processor in between pulsing to ensure even texture.
  3. Serve immediately.


Tuesday, March 26, 2013

Asparagus, Lemon & Goat Cheese Pasta

My husband and I got rid of cable about a year and a half ago.  For the most part, we survive without all the cable channels but the one I miss most is Food Network.  Luckily, PBS has the Create channel that has some decent cooking shows that satisfy my chef watching needs.  On Sunday night, we were watching Joanne Wier's Cooking Class and she was making something with asparagus and it looked amazing.   I was craving it all day Monday and knew I had to incorporate the green veggie into dinner. So, after searching the internet for asparagus pasta dishes I settled on this Bon Appetit Recipe with goat cheese and lemon. 


Here's the Fresh & Easy line-up:
Rotelli (you can use any spiral pasta), tarragon (I used dried), log of fresh goat cheese (MUST BUY LOG - the precrumbled stuff just will not melt as well), olive oil (not pictured), lemon, and asparagus.


First, get a pot of salted water boiling and add pasta. Cook 7 minutes. While waiting for pasta to cook, rinse and cut the asparagus into 1-1 1/2" pieces.  Add to pasta and cook an additional 3 minutes.

In a medium bowl, mix 1/4 cup olive oil, tarragon, zest of one lemon. 

Add goat cheese by crumbling it into pieces.

When pasta & asparagus are finished, reserve one cup of liquid and drain the rest.  Add back to pot and stir in the goat cheese mixture with 1/2 of the reserved liquid.  If it is dry, add more liquid until desired consistency is reached.  Mix until pasta is evenly coated. Season with salt and pepper and serve with a side salad. 

If you like goat cheese, you will LOVE this dish.  

Ingredients

  • 1 pound rotelli (spiral-shaped pasta)
  • 1 12oz. bag asparagus spears, trimmed, cut into 1- to 1 1/2-inch pieces
  • 1/4 cup olive oil
  • Zest of one lemon, juice of 1/2 lemon
  • 1 teaspoon dried tarragon or 2 tsp fresh tarragon
  • 1 4-ounce log soft fresh goat cheese

Directions

  • Cook pasta in large pot of boiling salted water until almost tender about 7 minutes. Add asparagus and cook 3 minutes longer.
  • In a medium bowl, mix 1/4 cup olive oil, tarragon, lemon zest & juice. Crumble in goat cheese.
  • When pasta & asparagus are finished, reserve one cup of liquid and drain the rest.  Add back to pot and stir in the goat cheese mixture with 1/2 of the reserved liquid.  If it is dry, add more liquid until desired consistency is reached.  Mix until pasta is evenly coated. Season with salt and pepper. 


Monday, March 25, 2013

Western Baby Shower and Cowboy Caviar


What a crazy couple of weeks it has been! Last weekend I threw a  baby shower for my beautiful best friend and mommy to-be, Rachel! I've known Rachel since I was 6 and I wanted it to be very special! (Special thanks to Lauren Earl for the photography - she is wonderful!)


She and her husband have decided on a Western theme for their nursery and it is adorable! I stuck with that theme for her baby shower and what a fun theme it was! 


The Saloon

I made these chalkboard wine glasses by spray painting the bottom of a wine glass with chalkboard paint.  I have twelve that I use for parties. To make them match the theme, I tied a piece of ribbon in a bow around the stem. (Shout out to my amazing friend Danielle who actually tied all the bows for this party - couldn't have pulled it off with out you!) I used chalk markers to write the guest's names on them. They are always a hit. 
The Sweets Station

The pink lemonade cake was made by Retro Bakery.  Their designs and flavors are fantastic.

Guest Book and Thank You Table


Chuck Wagon


I received a ton of compliments on the shower but the one thing people raved about most was the Cowboy Caviar which was actually one of the easiest things I made.


Cowboy Caviar
1 (15.8oz) can black beans, drained & rinsed
1 (14.5 oz) can of corn, drained
1 (14.5 oz) can petite diced tomatoes, drained
2 fresh medium jalapenos, seeded and minced
1 small red onion, minced
1 green bell pepper, seeded and diced
1/4 cup chopped fresh cilantro
6 tbsp red wine vinegar
6 tbsp extra virgin olive oil 
1 tsp. salt
1/2 tsp. ground black pepper
1 tsp garlic powder
1 tsp. dried oregano
2 tsp ground cumin

Mix all ingredients in a medium bowl.  Cover and refrigerate 2 hours or up to 2 days.   Serve with tortilla chips.

This is one of the easiest salsas to throw together in no time and people tend to love it. Give it a try at your next get together!


Tuesday, March 19, 2013

Bacon & Jalapeño PB&J

This is going to be one of those posts where you are just going to have to trust me. 

My husband and I visited Portland  in February and I was determined to visit to PBJs which is a little food truck tucked in between the shops on 23rd that specializes in gourmet peanut butter and jelly sandwiches.  They add ingredients to PB & Js that I would never have imagined in a million years.  I had done my Yelp research on PBJs before our visit and had already decided the two sandwiches I was going to order: The Hot Hood and The Oregonian.  Unfortunately, they were out of the ingredients (Challah bread, Marion berry jam, Rogue Creamery blue cheese, Oregon hazelnut butter) for the Oregonian so we ordered the Hot Hood and the Spencer.  We both became immediately obsessed with the Hot Hood.  They take challah bread, black cherry jam, jalapeno, apple wood  smoked bacon, PBJ’s peanut butter and put it all together for grilled yummy perfection.  I've been craving one ever since we left and while I'll be making a return trip in June for the real thing, I needed something to hold me over until then. So here we are - my copy cat PBJs Hot Hood aka the Bacon & Jalapeno PB&J.


(sidebar: this is in no way a replacement for the original - you must must must go to PBJs when visiting the Portland area - I insist!)

Here's our lineup:
Today I went to Glaziers, another local small market in my neighborhood. It is another great market and I feel so fortunate to have that and my beloved F&E so close. So, we start with our staples - NATURAL peanut butter, black cherry preserves, and challah bread. But wait, there's more - applewood smoked bacon and jalapeños!

First, I turned on my broiler, covered a pan with some tin foil and placed halved, seeded jalapeños on it.
I placed them under the broiler for 3-4 minutes until they charred on top.  This softens the jalapenos and takes away their crunch.  They looked like this when done:

Next, I cooked up the bacon... mmmmmm.... bacon!

Then I sliced my Challah bread into thick slices and spread butter on one side of each slice.


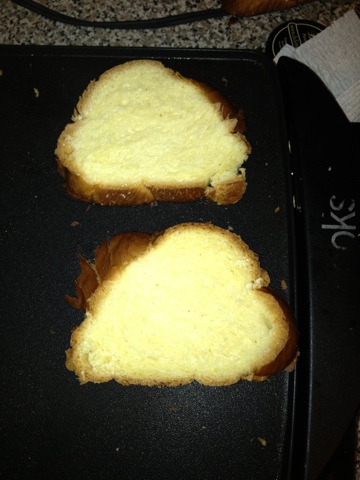
Then I placed the each slice on my griddle, butter side down. (you can do this in a regular pan over the stove if you do not have a griddle)  I removed the slices once they were golden brown.

I added peanut butter to one slice and black cherry preserves to the other.

Next, I added the jalapeno (sliced) and bacon

Then sandwiched, cut in half, served with milk and DEVOURED. Even went back for seconds. These little PBJs are so yummy! I cannot wait to return to Portland for the real thing, but for now, this copy cat recipe will more than do the trick when faced with this crazy craving. 

That's all for now.

Wednesday, March 13, 2013

Quinoa Burgers

I'm sure most of you have heard of Quinoa (keen-wah) - for those of you who haven't it's a magical little grain/seed.  Wikipedia defines it as " a species of goosefoot, is a grain-like crop grown primarily for its edible seeds. It is a pseudocereal rather than a true cereal, or grain, as it is not a member of the true grass family." So there, now that we kind of know what the heck it is - let me introduce you to a wonderful way to use it: Quinoa Burgers. 


I start with this recipe from Eating Well Living Thin.  I've seen a number of recipes for quinoa burgers but this is the first one I tried and we LOVED it so much that I've never wanted to stray...

Fresh and Easy is the absolute best when you're looking for something unusual (quinoa was unusual to me at first and I had no idea where to look in the store for it).  They have an entire grain/bean section with clearly marked, resealable bags.  Here's what it looks like in my store:


Here's the rest of our F&E ingredient line-up:
Quinoa, carrots, onion, cheddar cheese, cottage cheese, egg, salt, pepper, cumin, garlic powder, sugar, flour. 

First, make your quinoa. Boil water, add quinoa, and reduce heat.

It will take a while to cook (check package) but when it is done it looks like this:

Add all the ingredients into a large bowl and combine well:

Heat oil in a frying pan over medium-low to medium heat and place 1/4 cup of the mixture into the oil. I fit two patties in one frying pan:

Cook until golden brown, about 5 minutes on each side. Drain on paper towels and serve with burger fixin's.  I try something different every time I make these.  I served these with a tomato slice, greek yogurt and a side salad.

ENJOY!


Ingredients
  • 1 cup rounded quinoa
  • 1 medium carrot, grated 
  • 1 small yellow onion, finely chopped
  • ½ cup cheddar cheese, shredded
  • ½ cup cottage cheese
  • 1 egg
  • 3 tbsp flour
  • ½ tsp cumin
  • ¼ tsp sugar
  • ¼ tsp garlic powder 
  • ¼ tsp salt
  • ¼ tsp pepper
  • Olive oil, for frying


Directions
  1. Prepare quinoa per instructions on bag.
  2. In a large bowl, mix quinoa, carrots, onion, cheddar, cottage cheese, egg, flour, and spices.Combine well.
  3. Heat olive oil on a fry pan at med-low heat.  Drop ¼ cup mixture into fry pan and cook for about 5 minutes on each side. Patties are fragile so be careful when flipping.
  4. When golden brown on both sides, remove from pan and drain on paper towels.
  5. Serve with tomato, avocado, bacon and thousand island for a burger-like experience.

Makes 4 Burgers 

Monday, March 11, 2013

Holy Crazy Busy, Batman - What's for Dinner?

So, if you haven't noticed - I have been MIA for the past week! It has just been crazy around the house.  I am throwing my bestie a baby shower this weekend and prepping for the event has been hectic.  I am an uber planner and while there is nothing I love more than throwing a shower for my soon-to-be mommy friend, it is no exaggeration when I say that I go a little overboard on the planning.  That said, I look forward to a blog post next week with lots of adorable pictures from the shower. 

My poor husband hasn't had a Fresh & Easy homemade meal from his wifey dearest in a week, so it is about time I make up for that starting.... NOW!  Here's the menu:

Quinoa Burgers with salad
Pineapple & Chicken Curry w/Rice & Naan
Pork Tacos  w/Creamy Cilantro Slaw
Blue Cheese Crusted Filet w/Wedge Salad 
(Steak recipe per request from Adrian Young who started the petition to keep F&E stores open - if you haven't signed yet, do so by clicking HERE!)

I promise to not neglect the site as much as I have recently! Thanks for hanging in there with me!